Echo Show 8 to Home Assistant: The Long Version
The full build for turning a first-gen Echo Show 8 into a Home Assistant smart display: reflash, LineageOS, VACA and View Assist, and hybrid local voice.
On this page, 26 sections
- What the finished thing does
- 1. Gear, sources, and one rule about cables
- 2. Check the device before you write anything
- 3. Unlock and install TWRP
- 4. Back up Fire OS before you wipe
- 5. Wipe and install LineageOS
- 6. Set up a lightweight Android
- 7. Install VACA and View Assist in Home Assistant
- 8. My VACA settings
- 9. How the dashboard is laid out
- 10. The automatic screen router
- 11. The hybrid voice setup
- 12. Timers, alarms, and reminders
- 13. Meal Assistant and Grocy cook mode
- 14. Spotify and Music Assistant
- 15. Front-door camera and doorbell
- 16. Weather and the ambient clock
- 17. Making it mine: smart-home controls
- 18. Household organization
- 19. Apple TV remote
- 20. The Home Assistant package map
- 21. Testing it doesn’t lie to you
- 22. Backups and rollback
- 23. Known limitations
- 24. Security rules worth keeping
- 25. The short version
This is the long version. If you just want the why-I-did-it story, I wrote that up separately in I reflashed an Echo Show 8 into a Home Assistant satellite. What follows is the actual build: the hardware reflash, the Android kiosk, VACA and View Assist, the hybrid voice setup, the screen routing, and the Home Assistant packages that recreate the useful parts of the Echo Show and drop the parts I didn’t want.
I did the flashing in July and August 2026, and re-checked the live Home Assistant and VACA settings on August 31, 2026. Community packages move fast, so read the current maintainer instructions before you flash anything - don’t trust a copy, mine included.
Warning: The flashing stage writes boot-critical partitions and can permanently kill an unsupported device. This is only for the Echo Show 8 first generation, model
C7H6N3, codenamecrown. Never runcheckers,cronos, or any other Echo generation’s package on it.
What the finished thing does
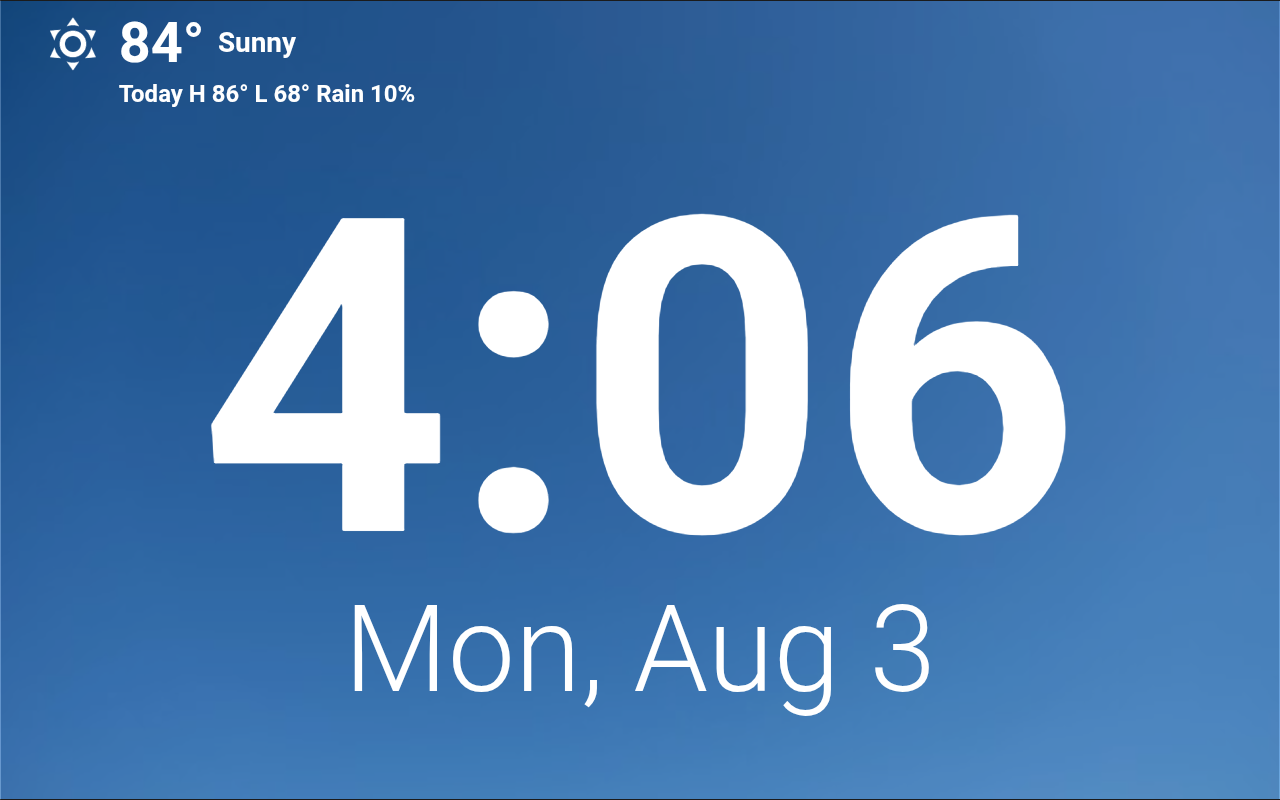
The Echo boots straight into a full-screen Home Assistant clock and weather display. Say “Alexa” and it starts a Home Assistant Assist conversation. Known household commands run locally; free-form language and general questions go to Gemini; if the cloud hiccups, a local Ollama model catches it.
The screen changes context on its own:
- Door motion pops up the front-door camera for a few seconds.
- A doorbell press opens the camera and announces the visitor.
- A recipe request opens a Grocy-aware, step-by-step cooking screen.
- Recipe timers show up inside the cooking screen instead of covering it.
- Weather, calendars, lists, notifications, climate, and the Apple TV remote each get their own touch view.
- Spotify playback adds a small control bar without taking over the screen.
- When an activity finishes or gets dismissed, the display goes back to the active recipe, or to the clock if there isn’t one.
It’s a Home Assistant appliance that happens to live in an Echo’s shell rather than an Echo Show clone: there’s no Amazon shopping, no Skills, no ads, no Amazon account.
1. Gear, sources, and one rule about cables
What you need
- An Echo Show 8 first gen and its AC adapter
- A USB cable you know carries data, not just power
- A Windows PC with at least 10 GB free for tools, ROMs, and backups
- A working Home Assistant install on a stable network
- Enough time to leave both AC power and USB connected through every write
Don’t plug the Echo in yet. Get the PC set up and download everything first. A power-only cable will give you the Windows connection chime but no reliable ADB or Fastboot device, and you’ll waste an hour before you figure that out. Test the cable before any write.
Where to get everything
- Amonet unlock, TWRP, and unbrick thread
- Unofficial LineageOS 18.1 for crown
- Google Android Platform Tools
- VACA companion app
- View Assist integration
- Music Assistant
Pull community packages from the original XDA post or the project’s own release page. Not firmware mirrors, not driver-download sites.
The exact files I used
| Package | Version/file | SHA-256 |
|---|---|---|
| Amonet crown | amonet-crown-v1.1.1.zip | 06B8863F7D5270610AC4D5A69603A3DAB2FE8DDF4EDEDDBDCA34E2D0DB494C05 |
| LineageOS | lineage-18.1-20260624-UNOFFICIAL-crown.zip | 0928D30E6B34C967B8FBF4CA37C58A0259A6C9F11295F037D121CCF5BA7BF4D4 |
| VACA | vaca-0.12.1.apk | 2EE97AB8EBC96A9FDB838FA69066707FE5B683A02B52678EE4965D0DAAE5278F |
| Obtainium | app-armeabi-v7a-release.apk, version 1.6.10 | 2F4FF5227E486AF985C665B6615A67EFFB498D6516662B98096BF1D0C43054CF |
| View Assist integration | 2026.7.0 source archive | 241EE34F15AA1377FF6E7C1922F4DB016F9634756059054C874A4FCA599DE5AF |
| VACA HA integration | 0.12.1 source archive | 25013AB86189CC55CDE8527FD855D4B4D6CB8D3BE2864B21F09D3D891658532C |
Those hashes are for the files I flashed. If you grab a newer maintainer release, verify its own published hash and device assertion - don’t expect it to match my table.
2. Check the device before you write anything
Confirm the label on the back says C7H6N3. Note the Fire OS version in settings. Then boot into Fastboot and run read-only checks first.
On my machine, Windows saw it as an Amazon Android Bootloader Interface, and the Amonet Fastboot binary returned:
product: CROWN
unlock_status: false
secure: yes
kernel: lk
is-fallback:
is-amonet:
product: CROWN is the one that matters. Stop on any other product name. Also stop if is-fallback is 1, storage reports eMMC-RO, USB keeps dropping, or the maintainer instructions don’t clearly support your installed Fire OS version.
I needed the Amazon USB driver on this PC because Fastboot first showed up as an unconfigured USB\VID_0BB4&PID_0C01 device. Only install a driver if Device Manager shows one is missing - don’t go hunting for drivers you don’t need.
3. Unlock and install TWRP
I used Amonet crown v1.1.1 for the unlock. Its Windows script checks the Fastboot product, refuses fallback mode, notices an already-unlocked device, and sends the crown fastbrick.img payload.
The destructive command inside the script is:
fastboot flash brick bin\fastbrick.imgThat’s not something to type by hand. Run the maintainer script from the extracted Amonet crown directory so its checks and error handling stay in place:
.\fastbrick.batFor the first exploit entry, follow the button prompt from your Amonet version. In v1.1.1 it tells you to hold both volume buttons and the mute button while powering on until Fastboot shows up. When the exploit works, the payload command on the PC may time out - on my run, that expected timeout was immediately followed by the device booting into TWRP.
Amonet installs TWRP with:
fastboot flash recovery bin\twrp.img
fastboot reboot recovery
TWRP 3.2.3-0 came up, and ADB saw it as:
recovery product:omni_crown model:Echo_Show_8 device:crownDon’t wipe anything yet.
4. Back up Fire OS before you wipe
The Amonet backup script streams the stock data, system, and boot partitions out of TWRP. I used Google Platform Tools 33.0.3 because newer ADB dropped the legacy backup command this TWRP workflow needs.
With TWRP awake on its main menu, run the Amonet backup.ps1 or backup.bat. It does the equivalent of:
adb backup -f data.ab --twrp data
adb backup -f system.ab --twrp system
adb backup -f boot.ab --twrp boot
My verified backup:
| File | Size | SHA-256 |
|---|---|---|
data.ab | 2,343,569,408 bytes | EE7150CA362AF1669B434EF1F19A6684AD0075889661635BCFDDA894C283C26D |
system.ab | 2,455,767,040 bytes | FDC7FEE411C93BD5FBA50BA604C42E6D235CB29FEC2B3AD34CBE16157B40B51B |
boot.ab | 17,827,840 bytes | 2BEE43FE90A7CB0FB902D2165A3D0E225BCFA26308EDC9383992EE55D4C7A513 |
Every file started with the expected TWRP stream header. I made a second copy and checked that both matched by SHA-256. These files only belong to this device - never restore them onto a different Echo.
5. Wipe and install LineageOS
Only after the backups checked out did I wipe data, system, and cache in TWRP. That’s Fire OS and your user data gone.
Start Advanced > ADB Sideload in TWRP, then run:
& 'C:\path\to\adb.exe' sideload `
  'C:\path\to\lineage-18.1-20260624-UNOFFICIAL-crown.zip'
A good install reports all expected blocks written, updater RC=0, status=0, and Amonet boot patch OK. Don’t reboot on an ambiguous updater result - stop and look.
I skipped GApps and Magisk on purpose. A normal reboot brought up LineageOS 18.1 on Android 11.
Boot modes after the conversion
- Normal Android: connect AC power without holding a button.
- TWRP: disconnect AC, hold Volume Up, reconnect AC, keep holding.
- Fastboot: disconnect AC, hold Volume Down, reconnect AC, keep holding.
- From Android with authorized ADB:
adb reboot recoveryoradb reboot bootloader. - The old Amazon mute button is now the Android power button.
6. Set up a lightweight Android
Finish Android setup with no Google account. Join Wi-Fi, turn on developer options and USB debugging for now, and install the two verified APKs:
adb install app-armeabi-v7a-release.apk
adb install vaca-0.12.1.apk
Set VACA as the default home activity:
com.msp1974.vacompanion/.MainActivityI left the full Home Assistant Companion app off. On a box with about 1 GB of RAM and 8 GB of storage, VACA already gives you the kiosk browser, Assist satellite, wake word, mic, media player, screen controls, and sensors with a lot less overhead.
Grant VACA microphone permission. You can grant camera permission too, but this LineageOS build exposes zero camera devices, so it won’t make the built-in camera work.
7. Install VACA and View Assist in Home Assistant
Install the matching custom_components/vaca and custom_components/view_assist integrations, and restart Home Assistant when the integration code asks for it.
My HA host was on Core 2026.6.4 at the final check. That’s a snapshot of my environment, not a version you have to hold back to.
Create a VACA integration entry pointing at the tablet’s LAN address, and reserve that address in DHCP. Create a View Assist master configuration and a satellite named Echo Show 8.
Use a dedicated non-admin Home Assistant user for the display, and log VACA in with that account. Don’t put the kiosk password in your config, in dashboard YAML, or reuse an admin password for it.
The entities that matter in my install:
| Role | Entity |
|---|---|
| View Assist device | sensor.echo_show_8 |
| Assist satellite | assist_satellite.vaca_2ae876ddd |
| Native VACA output | media_player.vaca_2ae876ddd_media_player |
| Music Assistant player | media_player.vaca_2ae876ddd_media_player_2 |
| Current browser route | sensor.vaca_2ae876ddd_current_path |
| VACA alarm state | switch.vaca_2ae876ddd_alarm |
Those suffixes are generated per install. Swap in the entities from your own device instead of copying 2ae876ddd.
8. My VACA settings
Live Echo settings as of August 31, 2026:
| Setting | Value |
|---|---|
| VACA version | 0.12.1 |
| Android / WebView | Android 11 / WebView 146.0.7680.153 |
| Assist pipeline | Gemini Premium |
| Wake-word engine | microWakeWord |
| Wake word | Alexa |
| Wake sound | None |
| Wake threshold | 4.0 |
| Microphone gain | 6 |
| Voice volume | 3/7 |
| Music volume | 12/15 |
| Ducking volume | 1/10 |
| Screen brightness | 50, auto-brightness on |
| Screen behavior | Always on; wake screen on wake word |
| Theme | Dark mode |
| Orientation | Auto, landscape on the Echo |
| Quick actions | Off |
| On-screen diagnostics | Off |
| Home screen | /view-assist/clock |
| View Assist screen mode | hide_header_sidebar |
I turned the wake sound off because the ding got old fast. A custom visual listening/speaking cue gives me feedback on the clock, camera, recipe, and other views instead.
The device has no hardware echo cancellation, noise suppression, or auto gain. Loud music can drown out “Alexa,” so the mic button on the music bar is the reliable touch-to-talk fallback. Wake tuning is a trade: a lower threshold picks you up better but also trips on conversation across the room.
9. How the dashboard is laid out
The View Assist dashboard isn’t one page. It’s 20 purpose-built views at 1280 x 800:
| Route | Purpose |
|---|---|
/view-assist/clock | Default clock, current weather, daily forecast, status, music dock |
/view-assist/home-controls | Favorite smart-home controls and status |
/view-assist/living-room-controls | Living-room lighting and white presets |
/view-assist/kitchen-controls | Kitchen lighting and brightness |
/view-assist/climate-controls | Temperature, setpoint, HVAC mode, fan mode |
/view-assist/apple-tv-controls | Touch remote and app launchers |
/view-assist/alarm | Active timer/alarm display |
/view-assist/alert | Priority notification with acknowledge, dismiss, reply |
/view-assist/calendar | Agenda and daily briefing preview |
/view-assist/camera | Timed camera preview |
/view-assist/list | Shopping list or household reminders |
/view-assist/weather | Detailed forecast and local concerns |
/view-assist/music | Native View Assist music view, kept but not used for the compact player |
/view-assist/info, infopic, intent, locate, sports, thermostat, webpage | View Assist support views and room to grow |
Meal Assistant gets its own dashboard:
/meals-and-recipes/menu: available meals, recipe catalog, shopping suggestions./meals-and-recipes/cook: full-width, step-by-step cook mode.
I’ve also got an Alcohol Assistant on /drinks-and-recipes/0, but I built that mainly for a portrait Samsung tablet and a separate Barkeep assistant, so treat it as a cousin project rather than part of the Echo’s default setup. If the drinks side is what you’re after, here’s how to build your own Alcohol Assistant integration.
Frontend resources it needs
My live install loads these project modules:
/meal_assistant/meal-assistant-card.js?v=0.4.7
/alcohol_assistant/alcohol-assistant-card.js?v=1.2.2
/local/community/lovelace-layout-card/layout-card.js?v=2.4.7
/view_assist/js/view_assist.js?v=1.0.29
/local/community/vaca-music-dock/vaca-music-dock.js?v=1.0.5
/local/community/vaca-voice-cue/vaca-voice-cue.js?v=1.0.0
That tiny red square with an exclamation mark is Home Assistant’s collapsed Lovelace configuration error. I hit it twice: once because layout-card was missing, once because the Meal Assistant bundle I’d deployed didn’t yet define meal-assistant-cook-card. Installing the missing resource, bumping its cache-busting query, and hitting VACA Refresh fixed both.
10. The automatic screen router
This is the single biggest usability win, so don’t skip it. Everything routes through one return-to-context script:
script.echo_show_return_to_contextThe rule is dead simple:
- If a recipe is active, go back to
/meals-and-recipes/cook. - Otherwise, go back to
/view-assist/clock.
Assist completion, music completion, timer dismissal, front-door timeout, doorbell timeout, recipe finish, recipe dismissal, alert expiry, and any transient-screen dismissal all call this. It’s what keeps you from landing on a stale or broken screen, which is the thing that makes most DIY kiosks feel janky.
Protected preview scripts hold the camera, weather, list, calendar, notification, or control views open for a set time. Their timeout and dismiss actions call the same router. Recipe-owned timers don’t navigate away from cook mode.
11. The hybrid voice setup
Handing an LLM the keys to every entity in Home Assistant would be flexible and a little terrifying. I split it into three layers instead:
- Deterministic local intents handle timers, locks, garage, music, Grocy changes, recipes, reminders, lists, and screen navigation - anything where a wrong target or a fake “done” actually matters.
- Gemini Premium takes paraphrases, follow-ups, and general questions after local matching. The pipeline has
prefer_local_intents: true. - Ollama fallback answers non-current general questions if Gemini errors out, comes back empty, hits a quota, or blows past a 20-second timeout.
The production wrapper is:
conversation.gemini_with_local_fallbackThe Ollama fallback path has no Home Assistant control tools on purpose. That way a device action can’t fire twice if the primary provider dies mid tool-call.
The contract I hold it to:
- A state-change claim has to come from an actual Home Assistant service or script.
- A “look, it’s on screen” claim has to come from a navigation or dashboard-state tool.
- Ambiguous targets ask for clarification instead of guessing.
- Unlocking the door or opening the garage needs a second spoken confirmation within 30 seconds.
- Alarm disarm isn’t exposed at all.
- Grocy consumption needs an exact product or an explicit recipe finish.
I added a separate search-enabled Gemini subagent for current info, but grounded web answers aren’t live yet - the Google project keeps returning RESOURCE_EXHAUSTED for Search. Regular Gemini still handles general knowledge, and Ollama covers the offline-style fallback.
12. Timers, alarms, and reminders
Timer phrases are matched locally so the AI can’t just claim it started one. The timer package does relative timers, clock-time alarms, names, status, targeted cancellation, bare “stop,” and snooze by exact ID.
The View Assist timer automation draws the visible countdown and rings VACA’s on-device alarm sound. Bare “stop” silences the ringing switch and drops you back to the recipe or clock. “Snooze” defaults to nine minutes and takes a bounded value from 1 to 120.
Reminders live in todo.household_reminders. Read, show, complete, cancel, and reschedule each need one exact active match. Reminder views use /view-assist/list, and dismissing restores the default todo.shopping_list.
While a recipe is active, “set a timer for this recipe for ten minutes” attaches the timer to that recipe. Its countdown renders inline in cook mode, survives expiry, and has both touch and voice stop.
13. Meal Assistant and Grocy cook mode
This is one of the spots where the reflash beats the original Echo. Meal Assistant ranks recipes against my real Grocy inventory and expiration dates. Mine’s a vibe-coded custom integration, so it’s not something you can download - but if you want to build something like it, I wrote up how to build your own Meal Assistant integration. This section is just how it plugs into the Echo.
Things it handles:
- “What can I make?”
- “Find me a recipe using chicken.”
- “Let’s use up what’s about to expire.”
- “I don’t like that recipe. Pick a different one.”
- “Next step,” “previous step,” “repeat that step.”
- “I am using [exact Grocy product].”
- “I finished this recipe.”
- “Dismiss this recipe” without touching inventory.
Recipe selection always searches the deterministic Meal Assistant catalog first. On a miss, it passes at most 80 canonical Grocy ingredient rows - quantities, locations, expiration dates - to the AI fallback. Anything it generates has to pass Meal Assistant validation and be makeable from current stock before it can even be staged.
Nothing gets deducted during search, staging, navigation, or dismiss. Only an explicit finish calls meal_assistant.consume_meal. Dismiss clears the recipe session and its timers without touching Grocy.
The cook card shows ingredients, metadata, progress, one instruction at a time, inline timers, Previous/Repeat/Next, Dismiss, and Finish. The active recipe and step live in helper entities, so voice and touch always point at the same session.
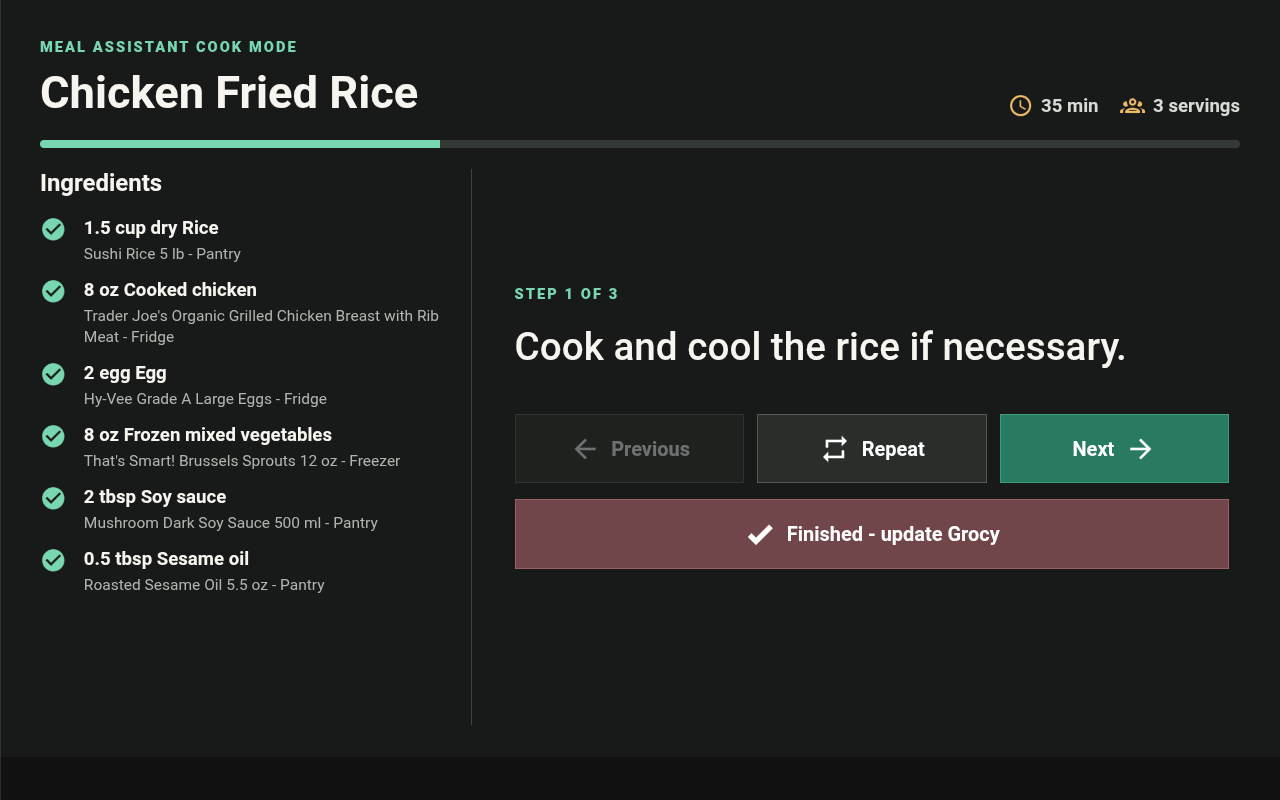
Photo food logging doesn’t work on this Echo because there’s no camera device. Use Grocy from a phone. There is now a community patch set that gets the OV9734 camera working on crown, but it ships as kernel and ROM patches you build yourself, not as a flashable ROM.
14. Spotify and Music Assistant
I upgraded Music Assistant from 2.9.3 to 2.9.10, set up Spotify as a provider, and added the native VACA player through the Home Assistant MediaPlayers provider.
Music Assistant creates the _2 entity for queue and search; the unsuffixed VACA entity stays the physical speaker output.
Voice covers:
- Track, album, artist, playlist, and artist-radio playback
- Queue next and add to queue
- Pause, resume, stop, next, previous
- Volume, mute, shuffle, repeat
- “What’s playing?”
During playback a 94-pixel music dock sits at the bottom of every compatible screen - artwork, title, artist, previous, pause/resume, next, stop, and a mic button. It doesn’t open a full-screen player and the whole bar isn’t a tap target.
15. Front-door camera and doorbell
The front-door package wires UniFi Protect events to the Echo:
- Motion opens the high-res front-door camera for 45 seconds.
- A doorbell press opens it for 90 seconds and announces, “Someone is ringing the doorbell.”
- “Show the front door” opens the same preview by voice.
- Timeout, Back, or Dismiss restores cook mode or the clock.
The camera page keeps the listening/speaking cue up, so voice doesn’t silently vanish while the feed is open.
This is view-only. Two-way door talk and event browsing aren’t built.
16. Weather and the ambient clock
The clock’s top-left weather block shows the current temperature and condition plus today’s high, low, and rain chance. I generate the degree symbol safely so it doesn’t come out as the old A-shaped garbage character.
Bounded weather tools give current conditions, today/tomorrow/four-day forecast, rain chance, and local concerns pulled from my WeatherFlow, lightning, UV, and AQI entities. There’s no official warning feed connected, so it says so rather than pretending to give an official all-clear.
A successful request opens the detailed weather screen for 45 seconds, then routes back through the router.
17. Making it mine: smart-home controls
The next three sections are the fun part, and they’re also the part you should copy the least. This is how I made the Echo mine - my rooms, my favorites, my remote. Yours will look nothing like it, and that’s the whole point. Once the plumbing from the earlier sections is in place, what you put on top is yours to decide. Take these as worked examples of what’s possible, not a spec to match. The two biggest ones each get their own build-your-own writeup: how to build a Meal Assistant integration and how to build an Alcohol Assistant integration.
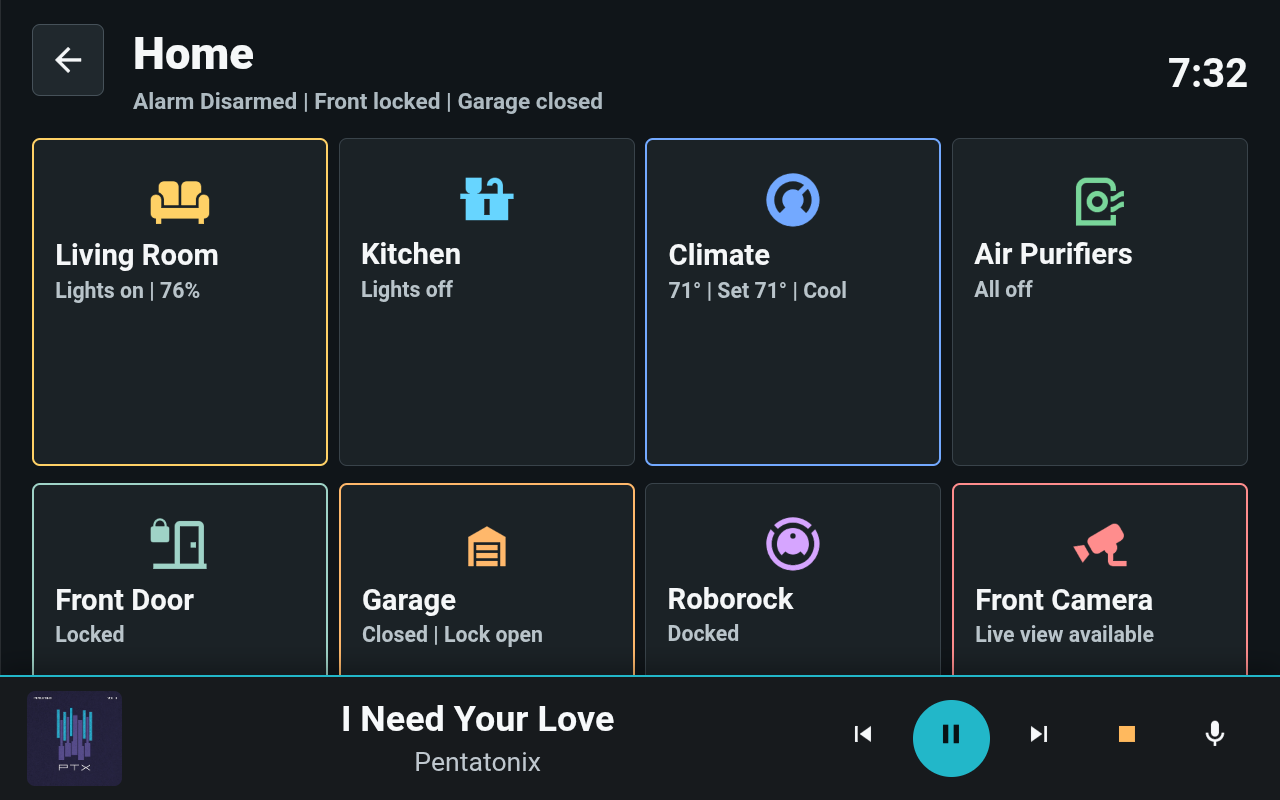
The Home Controls screen is dense and operational on purpose. It exposes the favorites I actually reach for, not every entity in the house:
- Living-room and kitchen lights
- Brightness and living-room white-temperature presets
- Living-room thermostat target, HVAC mode, fan mode
- Air purifiers
- Front-door and garage status
- Lock and close controls
- Roborock controls
- Front-door camera
- Apple TV remote entry
Touch can lock the front door and close the garage, but it can’t unlock, open, or disarm. Voice unlock/open uses the two-turn confirmation.
Room actions open the right control surface and hold it through the Assist response. Once the action’s done, the router restores the recipe or clock unless the detail screen is deliberately protected.
18. Household organization
These are the day-to-day Echo workflows I kept, again wired as bounded tools. Keep the ones you’d use and drop the rest:
- Shopping list: read, add, complete, remove, and clear completed items in
todo.shopping_list. - Calendar: today, tomorrow, and seven-day agenda across curated calendars.
- Event creation: stage the details, wait for a separate “confirm calendar event” turn, then write and verify. Staging expires after 60 seconds.
- Daily briefing: weather, deduplicated agenda, due reminders, shopping count.
- Routines: good morning, good night, leaving, movie night wrappers.
- Announcements: bounded house, Echo, or laundry targets. Normal messages are refused from 10 PM to 7 AM unless I explicitly say it’s urgent.
- Notifications: one active normal, important, or urgent notice, with expiry, read, acknowledge, dismiss, and source-bound reply.
Raw notify services, arbitrary scenes, arbitrary automations, and direct calendar writes are all hidden from the conversation agent. The wrappers do the validation and return a structured success or failure.
19. Apple TV remote
This one’s about as personal as it gets - my living room, my apps, my TV - so I’m including it as an example of wiring a media remote into the same framework, not because you’ll want a DROPOUT button of your own. /view-assist/apple-tv-controls gives me a touch remote plus matching local voice intents: power, Home/Menu, directional nav, Select, playback, previous/next, 10-second skip, volume, and launchers for Plex, YouTube, Disney+, and DROPOUT.
Power combines Apple TV CEC with the paired Samsung display, and a cancelable delayed guard repeats the TV-off if a late CEC wake shows up. Arbitrary remote commands and keyboard text aren’t exposed.
20. The Home Assistant package map
I split the whole thing into reviewable packages and custom sentence files, so each capability is testable and reversible on its own.
| Capability | Package under /config/packages | Sentence file under /config/custom_sentences/en |
|---|---|---|
| Activity return routing | echo_activity_navigation.yaml | none |
| Display navigation | echo_display_navigation.yaml | echo_display_navigation.yaml |
| Timers and alarms | timer_voice.yaml | timer_voice.yaml |
| Reminders | reminders_voice.yaml | reminders.yaml |
| Music | music_voice.yaml | music.yaml |
| Meal Assistant | meal_assistant_voice.yaml | meal_assistant.yaml |
| Front door | echo_front_door.yaml | package-driven |
| Smart-home voice | smart_home_voice.yaml | smart_home.yaml |
| Smart-home touch | echo_smart_home_touch.yaml | echo_smart_home_touch.yaml |
| Room controls | echo_room_controls.yaml | echo_room_controls.yaml |
| Apple TV | echo_apple_tv.yaml | echo_apple_tv.yaml |
| Lists and agenda | echo_household_organizer.yaml | echo_household_organizer.yaml |
| Routines and announcements | echo_routines_announcements.yaml | echo_routines_announcements.yaml |
| Calendar and briefing | echo_calendar_briefing.yaml | echo_calendar_briefing.yaml |
| Notifications | echo_notifications.yaml | echo_notifications.yaml |
| Weather | echo_weather_forecast.yaml | echo_weather_forecast.yaml |
| Current-information bridge | current_information.yaml | current_information.yaml |
Point Home Assistant at the package directory:
homeassistant:
  packages: !include_dir_named packages
The Gemini-to-Ollama wrapper lives under:
/config/custom_components/gemini_local_fallbackDeploy one feature at a time: validate the full config, read the deployed file back, reload only the domains you touched when you can, and take a checkpoint before the next slice. This part is boring and it’s exactly why the finished system is stable.
21. Testing it doesn’t lie to you
I keep an acceptance harness that sends text through the actual Echo-context Assist pipeline and checks Home Assistant state rather than only what the assistant said out loud.
Read-only smoke run:
node echo-crown/tests/echo-acceptance.mjsAll the reversible workflows:
node echo-crown/tests/echo-acceptance.mjs --suite all --liveThe audible alarm and announcement tests need an extra explicit flag:
node echo-crown/tests/echo-acceptance.mjs --suite timers --live --alertsThe harness refuses reversible tests when an unrelated timer, recipe, alarm, or music session is already going. It only cleans up records it made, and it never consumes Grocy stock, unlocks a door, opens the garage, or cancels a timer that isn’t its own. The suites cover routing, navigation, weather, notifications, lists, reminders, calendars, routines, timers, snooze, and recipes, and it writes JSON audit reports to echo-crown/test-results.
22. Backups and rollback
Three layers of “get me out of trouble”:
- Stock Fire OS backup: the verified
data.ab,system.ab, andboot.abcopies for a full return to stock. - Full Home Assistant backups: checkpoints after each big working slice - organizer, notifications, weather, room controls, Gemini fallback.
- Feature-level rollback directories: the pre-change packages, sentence files, dashboards, resources, and custom components under
/config/backups/codex-*, mirrored locally.
Before any new slice:
- Take a full HA backup when the blast radius is big.
- Export the affected Lovelace dashboard.
- Download the current package and sentence files.
- Record hashes.
- Deploy the smallest change you can.
- Run
ha core checkor the WebSocket config checker. - Hot reload when it’s safe; restart Core only for integration code that needs it.
- Run focused tests and leave a neutral final state.
To move the display by hand, call view_assist.navigate with the View Assist device and /view-assist/clock.
Going back to stock Fire OS
A stock restore wipes LineageOS and current Android data. Verify all three device-specific stock backup hashes first, boot to the TWRP main menu, keep USB and AC connected, and run the inspected Amonet restore.ps1 or restore.bat. Pick the verified backup directory when it asks. The script restores data.ab, system.ab, then boot.ab over the legacy ADB restore path. Only reboot after all three report success - if the output’s ambiguous, stop and look instead of writing partitions again.
23. Known limitations
- The camera is physically there but dead, because this LineageOS build exposes zero camera devices.
- SELinux is permissive on the unofficial ROM.
- Deep sleep is off, so keep it on AC power.
- The old mute button is now Android power.
- No hardware AEC/NS/AGC, so music can mask the wake word.
- Native Alexa calls, Drop In, Amazon messaging, shopping, and Skills are gone.
- On-device DRM video is impractical on a 1 GB box; the Apple TV remote is the better video path.
- Multi-room music, radio, podcasts, recurring weekday alarms, photo-frame rotation, camera browsing, and two-way door talk aren’t built.
- Current web search is quota-blocked even though the isolated search plumbing exists.
- Bluetooth is on and the adapter works, but I haven’t paired an external accessory.
24. Security rules worth keeping
- Keep VACA and Home Assistant behind the home router and firewall.
- Don’t port-forward the VACA service or expose the tablet directly.
- Use a dedicated non-admin kiosk account.
- Reserve device addresses in DHCP instead of hard-coding unstable leases.
- Expose only curated entities and scripts to Conversation.
- Require confirmation for unlock/open.
- Don’t expose alarm disarm until you’ve got an actual authorization policy.
- Keep credentials, API keys, LAN addresses, exact location, and backup encryption material out of anything public.
- Keep the stock backups and their hashes offline as well as on the workstation.
25. The short version
Once you’ve read the whole thing, this is the checklist:
- Confirm
C7H6N3, Fire OS support, and Fastbootproduct: CROWN. - Download only crown packages from current maintainer sources and verify hashes.
- Install the Amazon USB driver only if Windows needs it.
- Run the inspected Amonet crown script and get into TWRP.
- Back up
data,system, andboot; verify and duplicate them. - Wipe
data,system, andcachein TWRP. - Sideload the verified LineageOS crown ZIP and require a clean updater result.
- Boot Android with no GApps or Magisk.
- Install VACA and Obtainium; set VACA as Home; grant the mic.
- Install the matching VACA and View Assist integrations in Home Assistant.
- Create the kiosk user, VACA device, View Assist master, and Echo satellite.
- Set the wake word, pipeline, volumes, brightness, and kiosk options.
- Install
layout-card, the voice cue, music dock, Meal Assistant card, and View Assist resources. - Deploy the activity router before you add any transient screens.
- Add the timer, recipe, doorbell, music, weather, smart-home, organizer, notification, and Apple TV packages one at a time.
- Validate, reload, test, and checkpoint after each slice.
- Reboot with the PC unplugged and confirm it comes back to the clock, reconnects VACA, hears “Alexa,” answers, rings timers, and plays media.
The lesson is a small, boring contract rather than any single dashboard or prompt: local actions have to create real Home Assistant state changes, temporary screens have to own their own timeout and dismissal, every finished activity has to return to a known context, and the AI’s flexibility sits behind bounded tools instead of replacing them. Get that right and the thing feels solid. Skip it and you’ve got a fancy photo frame that occasionally lies to you.